Imago Printer
Printing gold foil on leather goods is a specialized art form that combines creativity and technique. According to John Smith, a leading expert in the leather printing industry, “The key to successful gold foil printing on leather is mastering temperature and pressure.” His insights highlight the importance of precision in this process.
Achieving a flawless gold foil print involves selecting the right materials. High-quality leather paired with appropriate foils enhances the final look. Additionally, understanding how heat affects leather is crucial. Temperatures that are too high can damage the material, leading to flaws.
Experimentation is often required. Many artisans encounter challenges during the learning curve. For example, incorrect pressure can result in uneven prints. It’s vital to be patient and reflective on past errors. Embracing these potential pitfalls can lead to mastery in "how to print gold foil on leather goods." Each mistake offers a lesson, shaping one’s skills over time.
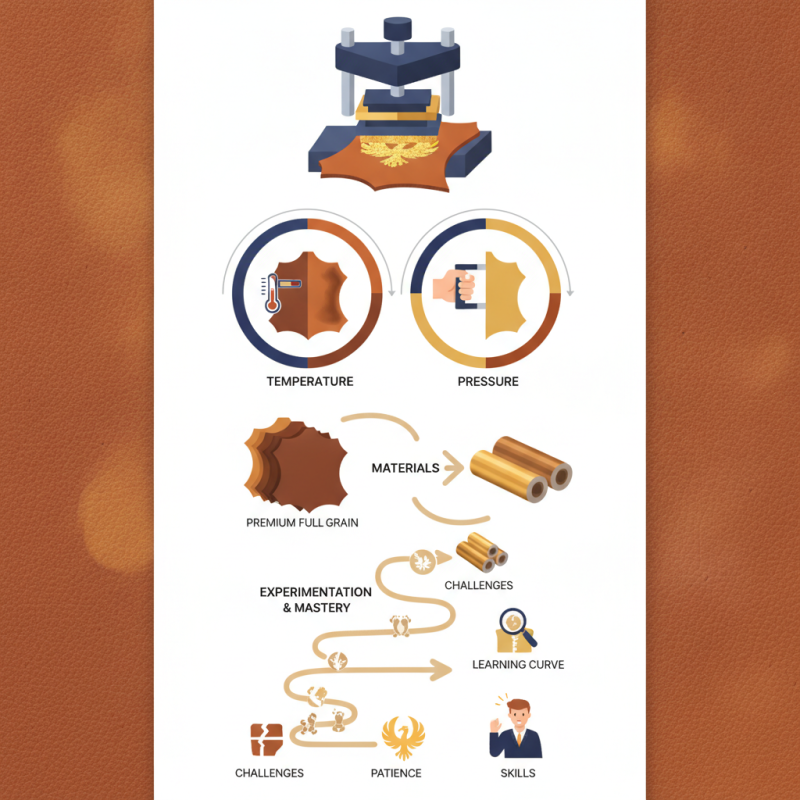
Gold foil printing on leather goods can elevate the design significantly. It's a meticulous process that demands precision and skill. The choice of leather is crucial. Different types can react uniquely to heat and pressure. Smooth, vegetable-tanned leather often gives the best results. Avoid overly textured surfaces, as they can hinder the foil from adhering properly.
Understanding the techniques in gold foil printing is essential. The most common method involves heat transfer, where a heated plate presses the foil onto the leather. The temperature and pressure settings require careful calibration. Too much heat can scorch the leather, while too little won't bond the foil effectively. Test runs are helpful but can be costly.
Mistakes can happen. Foil may not adhere evenly, leading to patchy designs. It's also common for marks to appear on the leather surface after printing. These are often overlooked, but they impact the final product's quality. Reflecting on these challenges can lead to improved techniques over time. Perfecting the art of gold foil printing involves patience and a commitment to learn from each experience.
Choosing the right leather is crucial for successful gold foil applications. Not all leather types respond well to foiling techniques.
Full-grain leather, for example, offers a natural texture that complements foil designs beautifully. Its robust surface allows for better adhesion and a stunning final appearance.
On the other hand, corrected leather might not achieve the same effect. This type has a synthetic finish that can repel adhesives. It’s essential to evaluate the leather's porosity and surface treatment.
Testing samples before the final application can save time and materials.
Consider the thickness of the leather as well. Thicker materials can offer more durability, but they also require more pressure during foiling. Finding a balance between thickness and flexibility adds complexity to your project.
Consulting with leather experts can provide valuable insights. Their experience might reveal hidden challenges that could affect the outcome.
When it comes to gold foil printing on leather, preparation is key. You’ll need essential tools and materials to achieve a polished outcome. Start with gold foil sheets, which provide the shimmer you desire. Make sure to select high-quality sheets to avoid peeling or fading. A hot foil stamping machine is vital for even heat distribution. This ensures your design adheres perfectly to the leather.
Additionally, choose the right adhesive. A heat-activated adhesive works best for leather, providing a strong bond. Always test on scrap pieces before applying to your final product. This allows you to adjust your technique without wasting materials.
Tip: Experiment with different pressure levels when stamping. Too much pressure can damage the leather, while too little may not transfer the foil correctly. Pay close attention to the temperature settings, as this can greatly affect the final result. Mistakes can happen, so keep a notebook of your trials. Reflect on what works and what doesn't for future projects. Also, consider documenting your process; this can enhance your skills over time.
This bar chart illustrates the effectiveness of various factors in gold foil printing on leather goods. The ratings indicate how each factor contributes to the overall quality of the printing process.
Applying gold foil to leather goods can elevate their appearance and make them truly unique. The process requires precision and the right materials. Begin by gathering your supplies: leather, gold foil sheets, adhesive, and a burnishing tool. Ensure the leather surface is clean and dry. Rough spots or dirt can interfere with the adhesion.
Once your leather is prepped, apply a thin layer of adhesive to the design area. Be cautious, as too much adhesive can lead to messy results. Allow the adhesive to become tacky. Carefully place a sheet of gold foil over the adhesive, making sure it covers the desired area completely. Use a burnishing tool to press the foil down firmly, ensuring it adheres well. This step can be tricky. The pressure must be even, or the foil may lift away unevenly.
If the finished product shows signs of uneven foil application, reflect on your technique. Practice on scrap leather may help improve your results. Make adjustments as needed. An imperfect finish can add character, though, and enhance the handmade appeal of the item. Gold foil application requires patience, but the transformation is worth the effort.
Gold foil printing on leather goods can create stunning visual effects. However, maintaining the quality and durability of these prints is crucial. Leather is a unique material that requires careful handling. According to industry reports, the lifespan of foil prints on leather varies significantly, with some studies indicating that poorly maintained prints can fade within months.
To ensure longevity, use high-quality foils designed for leather. Adopting a consistent application technique is essential. Many professionals recommend a controlled temperature during the printing process. This prevents the foil from adhering improperly. Reports suggest that prints subjected to extreme heat or moisture can become damaged quickly.
Cleaning leather goods with foil prints requires special care. Simple wipes can degrade the foil finish. Instead, use a damp cloth with a mild cleaner. Avoid soaking the leather as excessive moisture can cause the foil to peel or crack. Regularly conditioning the leather helps maintain its overall integrity. This can be a trial-and-error process, as not all methods may yield satisfactory results. Adjust and refine your techniques to find what works best for your needs.
| Tip | Description | Importance |
|---|---|---|
| Choose the Right Leather | Select high-quality leather that has a smooth surface for better adhesion and appearance of foil. | High |
| Proper Heat Settings | Adjust the temperature of the printing device to ensure optimal foil transfer without damaging the leather. | Critical |
| Use Quality Foil | Invest in high-quality gold foil that is designed for use on leather to enhance durability and visual appeal. | Essential |
| Test Print | Conduct a test print on a scrap piece of leather to fine-tune settings before the final print. | Important |
| Post-Printing Care | Allow adequate curing time and avoid moisture exposure to maintain the shine and adhesion of the foil. | Very High |
: You need gold foil sheets, a hot foil stamping machine, leather, adhesive, and a burnishing tool.
Use heat-activated adhesive on clean, dry leather for a strong bond. Test on scraps first.
Reflect on your technique and practice on scrap leather. Adjust pressure and temperature settings.
Apply a thin layer to the design area. Too much adhesive can create messy results; be cautious.
Even pressure is crucial. Too much can damage leather; too little may not transfer the foil correctly.
Yes, an imperfect finish can add character and enhance the handmade appeal of the item.
Keep a notebook of trials. Documenting your process helps you learn from mistakes and improve.
Ensure the leather surface is clean and free of dirt or rough spots that can interfere with adhesion.
Allow enough time for the adhesive to become tacky for best results before applying the foil.
No, it requires patience and precision. The transformation is worth the effort if done correctly.
In the guide titled "How to Print Gold Foil on Leather Goods Effectively," readers are introduced to the essential techniques for applying gold foil to leather items. The article emphasizes the importance of selecting the right type of leather for optimal results and provides an overview of the necessary tools and materials required for the process.
The step-by-step instructions ensure that even beginners can confidently execute the gold foil application, while additional tips highlight ways to maintain the quality and durability of the prints. Overall, this article serves as a comprehensive resource for anyone interested in learning how to print gold foil on leather goods, ensuring beautiful and long-lasting results.